How To Nestle Milo - The Addiction Photography Series - A Glass of Love
Nestle’s Milo is not just a sweet, milky chocolate drink, for me and many, it’s a way of life. For us, It is easy being green.
My addiction to this brown, heavenly drink, can be traced back to my Nana's house somewhere around 1983. A step stool would be unfolded at the kitchen bench and I’d climb the stairway to heaven. A glass of milo waited at the top of the stool, and there I’d sit, wishing the delicious moment would never end. A glass, that by the end was emptied of all its milk chocolate goodness and filled with memories that replay with every spoonful of Milo today.
I'm obsessed with Milo and it's probably bordering on addiction. I have a special ritual for my twice-yearly consumption, so to celebrate this habit of mine - I decided to snap some photos along the way from the opening that tin all the way down to the bottom of the glass! Let me tell you about how the ooey gooey deliciousness becomes an event for me each year.

Step 1 - Breaking The Seal
Okay, so here's the deal: this beautiful seal deserves more than ripping out in haste. We need to be gentle and precise; no ripping or tearing into it. Let’s get a flat-end spoon/knife instead, and delicately cut under the edge of that tin until we can take off that mirror-like cover in one piece! And don't forget - surgery-free fingers is our goal too! That way you can enjoy round two without worrying about dangerous shards messing up the next lucky consumer.

Step 2 - Pack The Glass
Step 2 is easy- just grab two glasses, and a tablespoon and get ready to shovel. Fill your first glass with heaped tablespoonfuls of Milo until it’s around ⅔ full – then press that powdery brown goodness down tight like you would fill a carryout container at an all-you-can-eat buffet. Keep scooping 'till the cup's been packed firmly flat - then you're good to go!

Step 3 - Gently Does It
If you thought drinking a Milo was an easy job, think again. To get the best possible experience from your drink of choice, step three calls for finesse and discipline! Gently pour milk over a teaspoon so as to evenly distribute and not disturb the packed goodness.

Step 4 - More More More
Time for round two! Now grab a second glass, fill it with some more milk and set aside the Milo. This is a critical step - you're gonna need that extra hint of dairy to make sure your delicious treat stays topped up all the way down to its final sip.

Step 5 - Eat, Drink, Joy
Get ready for some guilt-free spoonfuls of bliss! Carefully extract each mound of Milo, making sure you keep it glazed with milk. To ensure the most intense flavour experience imaginable - make sure to top off your glass as you go along and don't forget about that second jug of milk next to it. You'll be drunk on ultimate satisfaction by the time you hit bottom!
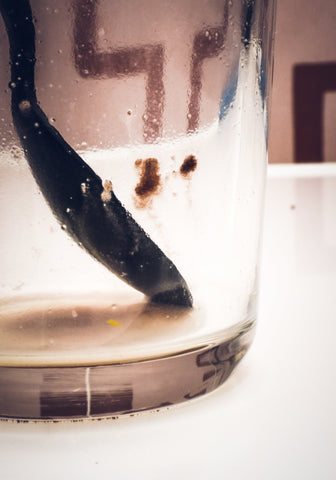
Note: If you can pace yourself and take your time to work through to the bottom of the glass, the remaining Milo will have melted to a gooey, gluggy, chocolatey sludge. It will be worth the wait.
My Nana was the culprit for my deep-rooted Milo obsession. Even though she only followed instructions, I'm thankful it led to such a meaningful time in childhood! Every sip of that chocolaty goodness takes me back to times when the sweetest thing in life was popped inside a chocolate milk tin. Thank you Nana.
Adam Davies
Check out some of the Milo Photography series here.